文章内容
一、简介
RestTemplate 是从 Spring3.0 开始支持的一个 HTTP 请求工具,它提供了常见的REST请求方案的模版,例如 GET 请求、POST 请求、PUT 请求、PATCH 请求、DELETE 请求以及一些通用的请求执行方法 exchange 以及 execute。RestTemplate 继承InterceptingHttpAccessor 并且实现了 RestOperations 接口,其中 RestOperations 接口定义了基本的 RESTful 操作,这些操作在 RestTemplate 中都得到了实现。
RestTemplate 是 Spring 提供的用于访问 Rest 服务的客户端库。它提供了一套接口,然后分别用三种 Java 最常用 Http 连接的库来分别实现这套接口:
- JDK 自带的 HttpURLConnection
- Apache 的 HttpClient
- OKHttp3
二、实现逻辑
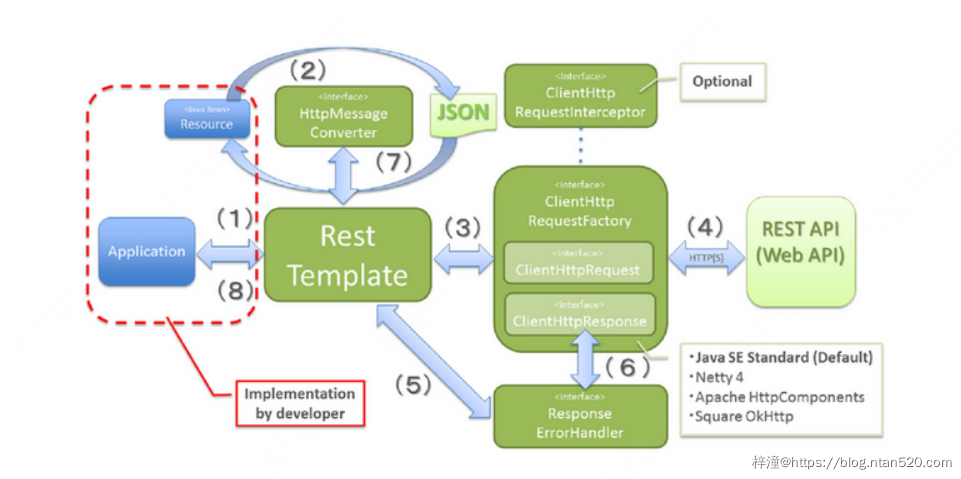
RestTemplate包含以下几个部分:
- HttpMessageConverter 对象转换器
- ClientHttpRequestFactory 默认是JDK的HttpURLConnection
- ResponseErrorHandler 异常处理
- ClientHttpRequestInterceptor 请求拦截器

三、RestTemplate集成及使用
1、依赖引入
<dependency>
    <groupId>org.springframework.boot</groupId>
    <artifactId>spring-boot-starter-web</artifactId>
</dependency>
2、RestTemplate装配
package com.ntan520.rest.config;

import org.springframework.context.annotation.Bean;
import org.springframework.context.annotation.Configuration;
import org.springframework.http.client.ClientHttpRequestFactory;
import org.springframework.http.client.SimpleClientHttpRequestFactory;
import org.springframework.web.client.RestTemplate;

@Configuration
public class RestTemplateConfig {

    @Bean
    public RestTemplate restTemplate(ClientHttpRequestFactory factory) {
        return new RestTemplate(factory);
    }

    @Bean
    public ClientHttpRequestFactory simpleClientHttpRequestFactory() {
        SimpleClientHttpRequestFactory factory = new SimpleClientHttpRequestFactory();
        // 客户端与服务端建立连接超时时间
        factory.setConnectTimeout(1000);
        // 客户端从服务端读取数据的超时时间
        factory.setReadTimeout(2000);
        return factory;
    }
}
3、RestTemplate使用
package com.ntan520.rest.controller;

import org.springframework.beans.factory.annotation.Autowired;
import org.springframework.web.bind.annotation.RestController;
import org.springframework.web.client.RestTemplate;

@RestController
public class TestController {

    @Autowired
    private RestTemplate restTemplate;

}
四、GET请求
使用 RestTemplate 发送 GET 请求。在 RestTemplate 中,和 GET 请求相关的方法有如下几个:

1、getForEntity使用详解
1){1}占位符传参
在响应的数据中必然也有响应头,如果开发者需要获取响应头的话,那么就需要使用 getForEntity 来发送 HTTP 请求,此时返回的对象是一个 ResponseEntity 的实例,这个实例中包含了响应数据以及响应头。
数据接口定义:
@GetMapping("/hello/get")
public String testGet(String name) {
    return "hello " + name + "!";
}
调用:
package com.ntan520.rest.controller;

import java.util.List;
import java.util.Map.Entry;

import org.springframework.beans.factory.annotation.Autowired;
import org.springframework.http.HttpHeaders;
import org.springframework.http.HttpStatus;
import org.springframework.http.ResponseEntity;
import org.springframework.web.bind.annotation.GetMapping;
import org.springframework.web.bind.annotation.RestController;
import org.springframework.web.client.RestTemplate;

@RestController
public class TestController {

    @Autowired
    private RestTemplate restTemplate;

    @GetMapping("/test/get")
    public String testGet(String name) {
        String url = "http://localhost:8080/hello/get?name={1}";
        ResponseEntity<String> response = restTemplate.getForEntity(url, String.class, name);
        StringBuffer sb = new StringBuffer();
        HttpStatus status = response.getStatusCode();
        String body = response.getBody();

        sb.append("status:").append(status).append("</br>").append("body:").append(body).append("</br>");

        HttpHeaders headers = response.getHeaders();

        for (Entry<String, List<String>> entry : headers.entrySet()) {
            sb.append(entry.getKey()).append(":").append(entry.getValue()).append("</br>");
        }

        return sb.toString();
    }
}
第一个参数是 url ,url 中有一个占位符 {1} ,如果有多个占位符分别用 {2} 、 {3} … 去表示,第二个参数是接口返回的数据类型,最后是一个可变长度的参数,用来给占位符填值。
在返回的 ResponseEntity 中,可以获取响应头中的信息,其中 getStatusCode 方法用来获取响应状态码, getBody 方法用来获取响应数据, getHeaders 方法用来获取响应头,在浏览器中访问该接口,结果如下:

2)Map方式传参
Map<String, Object> map = new HashMap<String, Object>();
String url = "http://localhost:8080/hello/get?name={name}";
map.put("name", name);
ResponseEntity<String> response = restTemplate.getForEntity(url, String.class, map);
3)url方式传参
String url = null;

try {
    url = "http://localhost:8080/hello/get?name=" + URLEncoder.encode(name, "UTF-8");
} catch (UnsupportedEncodingException e) {
    e.printStackTrace();
}

URI uri = URI.create(url);
ResponseEntity<String> response = restTemplate.getForEntity(uri, String.class);
说明:这种传参方式,参数如果是中文的话,需要对参数进行编码,使用 URLEncoder.encode 方法来实现。
2、getForObject使用详解
getForObject 方法和 getForEntity 方法类似,getForObject 方法也有三个重载的方法,参数和 getForEntity 一样,因此这里就不重复介绍参数了,这里主要说下 getForObject 和 getForEntity 的差异,这两个的差异主要体现在返回值的差异上, getForObject 的返回值就是服务提供者返回的数据,使用 getForObject 无法获取到响应头。
例如,还是上面的请求,利用 getForObject 来发送 HTTP 请求,如下:
String url = null;

try {
    url = "http://localhost:8080/hello/get?name=" + URLEncoder.encode(name, "UTF-8");
} catch (UnsupportedEncodingException e) {
    e.printStackTrace();
}

URI uri = URI.create(url);
String s = restTemplate.getForObject(uri, String.class);
说明:这里返回的 s 就是请求的返回值,如果开发者只关心请求的返回值,并不关系 HTTP 请求的响应头,那么可以使用该方法。
五、POST请求
和 GET 请求相比,RestTemplate 中的 POST 请求多了一个类型的方法,如下:

post 请求的方法类型除了 postForEntity 和 postForObject 之外,还有一个 postForLocation。这里的方法类型虽然有三种,但是这三种方法重载的参数基本是一样的,因此这里以 postForEntity 方法为例,来剖析三个重载方法的用法,最后再重点说下 postForLocation 方法。
1、postForEntity使用详解
1)传递 key/value 形式的参数
数据接口定义:
@PostMapping("/hello/post")
public String testPost(String name) {
    return "hello " + name + "!";
}
调用:
@GetMapping("/test/post")
public String testPost(String name) {
    String url = "http://localhost:8080/hello/post";
    MultiValueMap<String, Object> map = new LinkedMultiValueMap<String, Object>();
    map.add("name", name);
    ResponseEntity<String> response = restTemplate.postForEntity(url, map, String.class);
    return response.getBody();
}
postForEntity 方法第一个参数是请求地址,第二个参数 map 对象中存放着请求参数 key/value,第三个参数则是返回的数据类型。当然这里的第一个参数 url 地址也可以换成一个 Uri 对象,效果是一样的。这种方式传递的参数是以 key/value 形式传递的,在 post 请求中,也可以按照 get 请求的方式去传递 key/value 形式的参数,传递方式和 get 请求的传参方式基本一致,例如下面这样:
@GetMapping("/test/post")
public String testPost(String name) {
    String url = "http://localhost:8080/hello/post?name={1}";
    ResponseEntity<String> response = restTemplate.postForEntity(url, null, String.class, name);
    return response.getBody();
}
2)传递JSON数据
post 请求也可以直接传递 json 数据,在 post 请求中,可以自动将一个对象转换成 json 进行传输。
对象定义:
package com.ntan520.rest.model;

public class User {

    private String userName;

    private String address;

    public String getUserName() {
        return userName;
    }

    public void setUserName(String userName) {
        this.userName = userName;
    }

    public String getAddress() {
        return address;
    }

    public void setAddress(String address) {
        this.address = address;
    }
}
数据接口定义:
@PostMapping("/user/post")
public User testPostUser(@RequestBody User user) {
    return user;
}
调用:
@GetMapping("/test/post/user")
public User testPostUser() {
    String url = "http://localhost:8080/user/post";
    User user = new User();
    user.setUserName("Nick");
    user.setAddress("深圳");
    ResponseEntity<User> response = restTemplate.postForEntity(url, user, User.class);
    return response.getBody();
}
2、postForObject使用详解
postForObject 和 postForEntity 基本一致,就是返回类型不同而已。
3、postForLocation使用详解
postForLocation 方法的返回值是一个 Uri 对象,因为 POST 请求一般用来添加数据,有的时候需要将刚刚添加成功的数据的 URL 返回来,此时就可以使用这个方法,一个常见的使用场景如用户注册功能,用户注册成功之后,可能就自动跳转到登录页面了,此时就可以使用该方法。
数据接口定义:
@PostMapping("/register")
public String register(@RequestBody User user) throws UnsupportedEncodingException {
    return "redirect:/login/page?userName=" + URLEncoder.encode(user.getUserName(), "UTF-8") + "&address="
            + URLEncoder.encode(user.getAddress(), "UTF-8");
}

@PostMapping("/login/page")
public String loginPage(@RequestBody User user) {
    return "loginPage:" + user.getUserName() + ":" + user.getAddress();
}
调用:
@GetMapping("/test/post/location")
public String testPostLocation() {
    String url = "http://localhost:8080/register";
    MultiValueMap<String, Object> map = new LinkedMultiValueMap<String, Object>();
    map.add("userName", "Nick");
    map.add("address", "深圳");
    URI uri = restTemplate.postForLocation(url, map);
    String s = restTemplate.getForObject(uri, String.class);
    return s;
}
这里首先调用 postForLocation 获取 Uri 地址,然后再利用 getForObject 请求 Uri,结果如下:

说明:postForLocation 方法返回的 Uri 实际上是指响应头的 Location 字段,所以,请求中 register 接口的响应头必须要有 Location 字段(即请求的接口实际上是一个重定向的接口),否则 postForLocation 方法的返回值为null
六、PUT请求
PUT 请求方法比较少,如下:

这三个重载的方法其参数其实和 POST 是一样的,可以用 key/value 的形式传参,也可以用 JSON 的形式传参,无论哪种方式,都是没有返回值的
七、PATCH请求
PATCH 请求方法比较少,如下:

这三个重载的方法其参数其实和 POST 是一样的,可以用 key/value 的形式传参,也可以用 JSON 的形式传参,无论哪种方式,都是没有返回值的
八、DELETE请求
DELETE 请求方法比较少,如下:

不同于 POST 和 PUT ,DELETE 请求的参数只能在地址栏传送,可以是直接放在路径中,也可以用 key/value 的形式传递,当然,这里也是没有返回值的。
九、设置请求头
自定义请求头可以通过拦截器的方式来实现;定义拦截器、自动修改请求数据、一些身份认证信息等,都可以在拦截器中来统一处理。具体操作步骤如下:
@GetMapping("/test/header")
public String testHeader(String name) {
    String url = "http://localhost:8080/hello/get?name={1}";

    restTemplate.setInterceptors(Collections.singletonList(new ClientHttpRequestInterceptor() {

        @Override
        public ClientHttpResponse intercept(HttpRequest request, byte[] body, ClientHttpRequestExecution execution) throws IOException {
            HttpHeaders headers = request.getHeaders();
            headers.add("cookie", "helloworld");
            return execution.execute(request, body);
        }
    }));

    String s = restTemplate.getForObject(url, String.class, name);
    return s;
}
通过调用 RestTemplate 的 setInterceptors 方法来给它设置拦截器,拦截器也可以有多个。在拦截器中,将请求拿出来,给它设置 cookie,然后调用execute方法让请求继续执行。此时,在 /hello/get 接口中,就能获取到 cookie了。
@GetMapping("/hello/get")
public String testGet(String name, HttpServletRequest request) {
    System.out.println(request.getHeader("cookie"));
    return "hello " + name + "!";
}
十、通用方法exchange
在 RestTemplate 中还有一个通用的方法 exchange。为什么说它通用呢?因为这个方法需要在调用的时候去指定请求类型,即它既能做 GET 请求,也能做 POST 请求,也能做其它各种类型的请求。如果开发者需要对请求进行封装,使用它再合适不过了,举个简单例子:
@GetMapping("/test/exchange")
public String testExchange(String name) {
    String url = "http://localhost:8080/hello/get?name={1}";
    HttpHeaders headers = new HttpHeaders();
    headers.add("cookie", "helloworld");
    HttpEntity<MultiValueMap<String, String>> request = new HttpEntity<MultiValueMap<String, String>>(null, headers);
    ResponseEntity<String> response = restTemplate.exchange(url, HttpMethod.GET, request, String.class, name);
    return response.getBody();
}
这里的参数和前面的也都差不多,注意就是多了一个请求类型的参数,然后创建一个 HttpEntity 作为参数来传递。 HttpEntity 在创建时候需要传递两个参数,第一个上文给了一个 null ,这个参数实际上就相当于 POST/PUT 请求中的第二个参数,有需要可以自行定义。HttpEntity 创建时的第二个参数就是请求头了,也就是说,如果使用 exchange 来发送请求,可以直接定义请求头,而不需要使用拦截器。
