文章内容
一、监听器Listener简介
1、监听器Listener介绍
1)定义及用途
Listener是JavaWeb的三大组件(Servlet、Filter、Listener)之一,JavaWeb中的监听器主要用于监听:ServletContext、HttpSession、ServletRequest 的生命周期以及属性变化。变量的创建、销毁和修改等。可以在某些动作前后增加处理,实现监控。
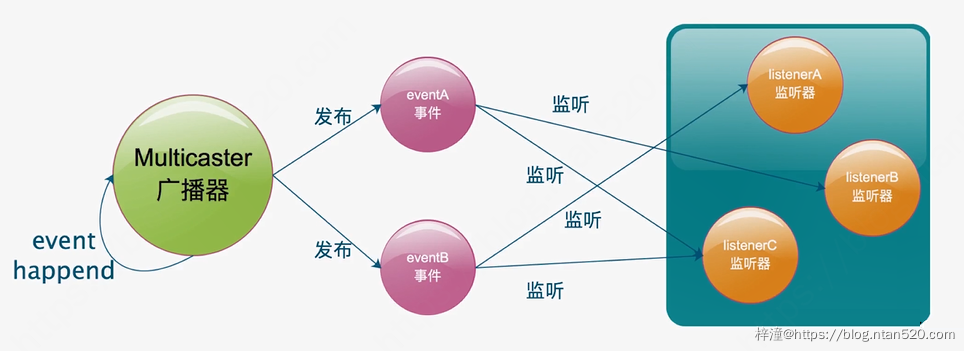
2)工作流程

2、SpringBoot系统监听器介绍
1)SpringBoot 2.x中定义的事件类型
| EventType | 发布时间 |
|---|---|
| ApplicationContextInitializedEvent | SpringApplication正在启动, ApplicationContext 已经准备好了, ApplicationContextInitializers 被调用, bean definitions 被加载之前 |
| ApplicationEnvironmentPreparedEvent | 装配完参数和环境后触发的事件 |
| ApplicationFailedEvent | Spring Boot 启动失败时触发 |
| ApplicationPreparedEvent | 上下文 Context 准备时触发 |
| ApplicationReadyEvent | 上下文准备完毕的时触发 |
| ApplicationStartedEvent | Spring Boot 启动监听类 |
| ApplicationStartingEvent | 上下文准备完毕的时触发 |
2)SpringBoot 2.x事件类图

二、SpringBoot中监听器Listener的使用
1、监听Servlet上下文对象
监听 Servlet 上下文对象可以用来初始化数据,用于缓存。
1)示例代码
示例代码如下,从代码可以看出,这个监听类主要是在Spring容器启动之后,自动触发此监听器的onApplicationEvent方法,并执行方法中的内容:
@Slf4j
@Component
public class MyServletContextListener implements ApplicationListener<ContextRefreshedEvent> {

    @Override
    public void onApplicationEvent(ContextRefreshedEvent contextRefreshedEvent) {
        log.info("Spring容器加载完成触发,可用于初始化环境,准备测试数据、加载一些数据到内存");
        //此处可以开启一个线程,用于查询数据,并进行缓存。
        //代码省略
    }
}
2)测试结果
我们可以看到,启动过程中加载应用上下文时执行我们编写的监听器代码。在实际开发中,我们可以在次数处理需要预加载或者需要缓存的数据。

2、监听HTTP会话Session对象
常用来监听 Session 对象,以获取在线用户数量
1)示例代码
示例代码如下,从代码可以看出该监听器首先需要实现 HttpSessionListener 接口,然后重写 sessionCreated创建方法和 sessionDestroyed 销毁方法,在 sessionCreated 方法中传递一个HttpSessionEvent对象,之后将当前 Session中的用户数量加 1,sessionDestroyed 方法刚好相反。
/**
 * 功能描述:  HTTP 会话监听器
 */@Component
@Slf4j
public class MyHttpSessionListener implements HttpSessionListener {

    public static AtomicInteger count = new AtomicInteger();

    @Override
    public  void sessionCreated(HttpSessionEvent httpSessionEvent) {
        log.info("新用户上线了");
        count.incrementAndGet();
        httpSessionEvent.getSession().getServletContext().setAttribute("count", count.get());
    }

    @Override
    public  void sessionDestroyed(HttpSessionEvent httpSessionEvent) {
        log.info("用户下线了");
        count.decrementAndGet();
        httpSessionEvent.getSession().getServletContext().setAttribute("count", count.get());
    }
}
@RestController
@RequestMapping("/event")
public class EventController {

    @GetMapping("/test")
    public Object test(HttpServletRequest request){
        Integer count = (Integer) request.getSession().getServletContext().getAttribute("count");
        return "当前在线人数:" + count;
    }
}
2)测试结果
在不同浏览器打开 http://127.0.0.1:8080/event/test,可以看到如下结果:

3、监听客户端请求Servlet Request对象
1)示例代码
示例代码如下,实现ServletRequestListener接口即可,然后通过request对象获取一些信息。
/**
 * 功能描述: 客户端请求 Servlet Request 监听
 */@Component
@Slf4j
public class MyServletRequestListener implements ServletRequestListener {

    @Override
    public void requestInitialized(ServletRequestEvent servletRequestEvent) {
        HttpServletRequest request = (HttpServletRequest) servletRequestEvent.getServletRequest();
        log.info("session id:{}", request.getRequestedSessionId());
        log.info("request url:{}", request.getRequestURL());
        request.setAttribute("username", "Trazen");
    }

    @Override
    public void requestDestroyed(ServletRequestEvent servletRequestEvent) {
        log.info("request end");
        HttpServletRequest request = (HttpServletRequest) servletRequestEvent.getServletRequest();
        log.info("request域中保存的username值为{}", request.getAttribute("username"));
    }
}
2)测试结果
请求接口http://127.0.0.1:8080/event/test,可以看到控制台打印如下:

4、自定义事件监听器
在实际项目中,通常需要自定义一些事件和监听器来满足业务场景,比如在微服务中会有这样的场景:微服务A在处理完某个逻辑之后,需要通知微服务B去处理另一个逻辑,或者微服务 A 处理完某个逻辑之后,需要将数据同步到微服务 B,这种场景非常普遍,这个时候我们可以自定义事件以及监听器来监听,一旦监听到微服务A 中的某事件发生,就去通知微服务 B 处理对应的逻辑。
自定义事件监听器步骤如下:
- 自定义事件:编写一个事件,只需要继承ApplicationEvent即可
- 自定义监听器:自定义监听器实现 ApplicationListener接口,把自定义的事件作为参数,重写onApplicationEvent方法即可
- 触发器:注入ApplicationContext,调用publishEvent发布自定义事件即可
- 调用触发器:简单了,就是写个controller类,调用触发器方法即可
1)自定义事件
编写一个事件,只需要继承 ApplicationEvent对象,在事件中定义一个User对象来模拟数据,构造方法中将 User对象传进来初始化。
如下:
/**
 * 功能描述: 自定义事件
 */public class MyEvent extends ApplicationEvent {

    @Getter
    @Setter
    private User user;

    public MyEvent(Object source, User user) {
        super(source);
        this.user = user;
    }
}
@Data
public class User {

    private String username;
}
2)自定义监听器
自定义一个监听器来监听上面定义的MyEvent事件,自定义监听器需要实现 ApplicationListener接口即可。
具体代码如下,重写onApplicationEvent方法,将自定义的MyEvent事件传进来,因为该事件中,定义了 User对象,然后就可以使用该对象的信息了。
/**
 * 功能描述: 自定义监听器
 */@Component
public class MyEventListener implements ApplicationListener<MyEvent> {
    @Override
    public void onApplicationEvent(MyEvent myEvent) {
        // 把事件中的信息获取到
        User user = myEvent.getUser();
        // 处理事件,实际项目中可以处理其他逻辑等等
        System.out.println("用户名:" + user.getUsername());
    }
}
3)发布事件
代码如下,在service中注入ApplicationContext,在业务代码处理完之后,通过ApplicationContext对象手动发布 MyEvent事件,这样自定义的监听器就能监听到,然后处理监听器中写好的业务逻辑。
public interface UserService {

    /**
     * add user
     */    void addUser();
}
@Service
@RequiredArgsConstructor
public class UserServiceImpl implements UserService {

    private final ApplicationContext applicationContext;

    @Override
    public void addUser() {
        User user = new User();
        user.setUsername("Trazen");

        // 发布事件
        MyEvent event = new MyEvent(this, user);
        applicationContext.publishEvent(event);
    }
}
@RestController
@RequestMapping("/event")
@RequiredArgsConstructor
public class EventController {

    private final UserService userService;

    @GetMapping("/addUser")
    public Object addUser(){
        userService.addUser();
        return "success";
    }
}
4)测试结果
请求链接http://127.0.0.1:8080/event/addUser,可以看到监听器生效。

