文章内容
在微服务架构中,注册中心是最核心的基础服务之一。
一、注册中心原理
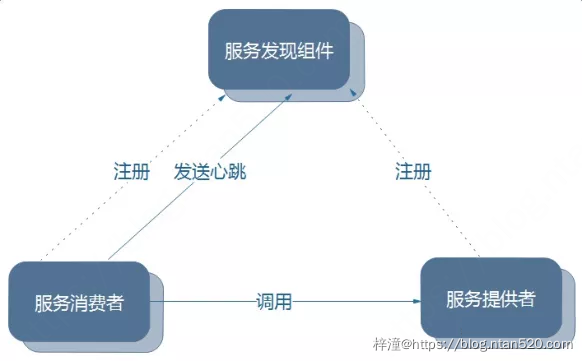
1、注册中心主要涉及到三大角色
- 服务提供者
- 服务消费者
- 注册中心
2、三大角色之间的关系
- 各个微服务在启动时,将自己的网络地址等信息注册到注册中心,注册中心存储这些数据。
- 服务消费者从注册中心查询服务提供者的地址,并通过该地址调用服务提供者的接口。
- 各个微服务与注册中心使用一定机制(例如心跳)通信。如果注册中心与某微服务长时间无法通信,就会注销该实例。
- 微服务网络地址发送变化(例如实例增加或IP变动等)时,会重新注册到注册中心。这样,服务消费者就无需人工修改提供者的网络地址了。
3、注册中心的架构图

二、注册中心功能
注注册中心应具备以下功能:
1、服务注册表
服务注册表是注册中心的核心,它用来记录各个微服务的信息,例如微服务的名称、IP、端口等。服务注册表提供查询API和管理API,查询API用于查询可用的微服务实例,管理API用于服务的注册与注销。
2、服务注册与发现
服务注册是指微服务在启动时,将自己的信息注册到注册中心的过程。服务发现是指查询可用的微服务列表及网络地址的机制。
3、服务检查
注册中心使用一定的机制定时检测已注册的服务,如发现某实例长时间无法访问,就会从服务注册表移除该实例。
三、Eureka介绍
Eureka是Netflix开发的服务发现框架,SpringCloud将它集成在其子项目spring-cloud-netflix中,以实现SpringCloud的服务发现功能。
Eureka包含两个组件:Eureka Server和Eureka Client
- Eureka Server提供服务注册服务,各个节点启动后,会在Eureka Server中进行注册,这样EurekaServer中的服务注册表中将会存储所有可用服务节点的信息,服务节点的信息可以在界面中直观的看到。
- Eureka Client是一个java客户端,用于简化与Eureka Server的交互,客户端同时也就是一个内置的、使用轮询(round-robin)负载算法的负载均衡器。
四、搭建注册中心
首先新建一个SpringBoot项目,命名spring-cloud-eureka,然后按照下面步骤编写代码即可:
1、pom.xml代码
添加eureka-server的依赖,代码如下:
    <dependencies>
        <dependency>
            <groupId>org.springframework.boot</groupId>
            <artifactId>spring-boot-starter</artifactId>
        </dependency>

        <dependency>
            <groupId>org.springframework.cloud</groupId>
            <artifactId>spring-cloud-starter-netflix-eureka-server</artifactId>
        </dependency>

        <dependency>
            <groupId>org.springframework.boot</groupId>
            <artifactId>spring-boot-starter-test</artifactId>
            <scope>test</scope>
        </dependency>
    </dependencies>

    <dependencyManagement>
        <dependencies>
            <dependency>
                <groupId>org.springframework.cloud</groupId>
                <artifactId>spring-cloud-dependencies</artifactId>
                <version>Finchley.RELEASE</version><!-- eureka版本 -->
                <type>pom</type>
                <scope>import</scope>
            </dependency>
        </dependencies>
    </dependencyManagement>
2、启动类代码
启动类添加注解@EnableEurekaServer即可,代码如下:
@EnableEurekaServer
@SpringBootApplication
public class SpringCloudEurekaApplication {
    public static void main(String[] args) {
        SpringApplication.run(SpringCloudEurekaApplication.class, args);
    }
}
3、配置文件
使用yml的配置文件,application.yml配置如下:
server:
  port: 9001 #服务端口
eureka:
  instance:
    hostname: localhost
  client:
    register-with-eureka: false #是否将eureka自身作为应用注册到eureka注册中心
    fetch-registry: false #为true时,可以启动,但报异常:Cannot execute request on any known server
    serviceUrl:
      defaultZone: http://${eureka.instance.hostname}:${server.port}/eureka/
配置项说明:
- server.port=9001:表示设置该服务注册中心的端口号
- eureka.instance.hostname=localhost:表示设置该服务注册中心的hostname
- eureka.client.register-with-eureka=false:由于目前创建的应用是一个服务注册中心,而不是普通的应用。默认情况下,这个应用会向注册中心(也是它自己)注册它自己,设置为false表示禁止这种默认行为
- eureka.client.fetch-registry=false:表示不去检索其他的服务,因为服务注册中心本身的职责就是维护服务实例,它也不需要去检索其他服务
4、运行截图
打开浏览器访问http://localhost:9001/,可以看到注册中心以及启动,运行截图如下:

五、注册服务
服务注册中心有了之后,我们可以向这个服务注册中心注册一个服务提供者,新建一个SpringBoot项目,命名spring-cloud-user-service,提供用户服务,然后按照下面步骤编写代码即可:
1、pom.xml代码
添加eureka-server的依赖,代码如下:
<dependencies>
    <dependency>
        <groupId>org.springframework.boot</groupId>
        <artifactId>spring-boot-starter-web</artifactId>
    </dependency>

    <dependency>
        <groupId>org.springframework.boot</groupId>
        <artifactId>spring-boot-starter-test</artifactId>
        <scope>test</scope>
    </dependency>

    <dependency>
        <groupId>org.springframework.cloud</groupId>
        <artifactId>spring-cloud-starter-netflix-eureka-server</artifactId>
    </dependency>


</dependencies>

<dependencyManagement>
    <dependencies>
        <dependency>
            <groupId>org.springframework.cloud</groupId>
            <artifactId>spring-cloud-dependencies</artifactId>
            <version>Finchley.RELEASE</version><!-- eureka版本 -->
            <type>pom</type>
            <scope>import</scope>
        </dependency>
    </dependencies>
</dependencyManagement>
2、启动类代码
启动类添加注解@EnableEurekaClient即可,代码如下:
@EnableEurekaClient
@SpringBootApplication
public class UserServiceDemoApplication {

    public static void main(String[] args) {
        SpringApplication.run(UserServiceDemoApplication.class, args);
    }
}
3、配置文件
使用yml的配置文件,application.yml配置如下:
server:
  port: 8081 #服务端口
eureka:
  client:
    serviceUrl:
      defaultZone: http://localhost:9001/eureka/
spring:
  application:
    name: user-service
4、运行截图
打开浏览器访问http://localhost:9001/,与上图相比可以看到注册中心中已经注册好了用户服务,截图如下:

